
Webhooks automate data transfers from WordPress forms to other tools like CRMs, Slack, or APIs. They eliminate manual exports, reduce errors by 80–90%, and improve productivity by 20–25%. Here’s how they work: when someone submits a form, data is sent (often as JSON) to a specified URL instantly.
Key Takeaways:
- What Are Webhooks? Automated HTTP requests triggered by events (e.g., form submissions).
- Why Use Them? Save time, reduce errors, and improve workflows by sending data directly to external tools.
- Supported Plugins: WPForms, Gravity Forms, Ninja Forms, Elementor Forms, and MetForm.
- Setup Steps: Enable webhooks, configure the endpoint URL, map fields, and follow WordPress development best practices for secure sites to protect your data.
- Testing & Security: Use tools like webhook.site for testing and secure connections with HTTPS and HMAC-SHA256.
Webhooks are perfect for automating tasks like sending leads to CRMs, triggering Slack notifications, or connecting to custom APIs. Learn to configure and secure them for efficient workflows.
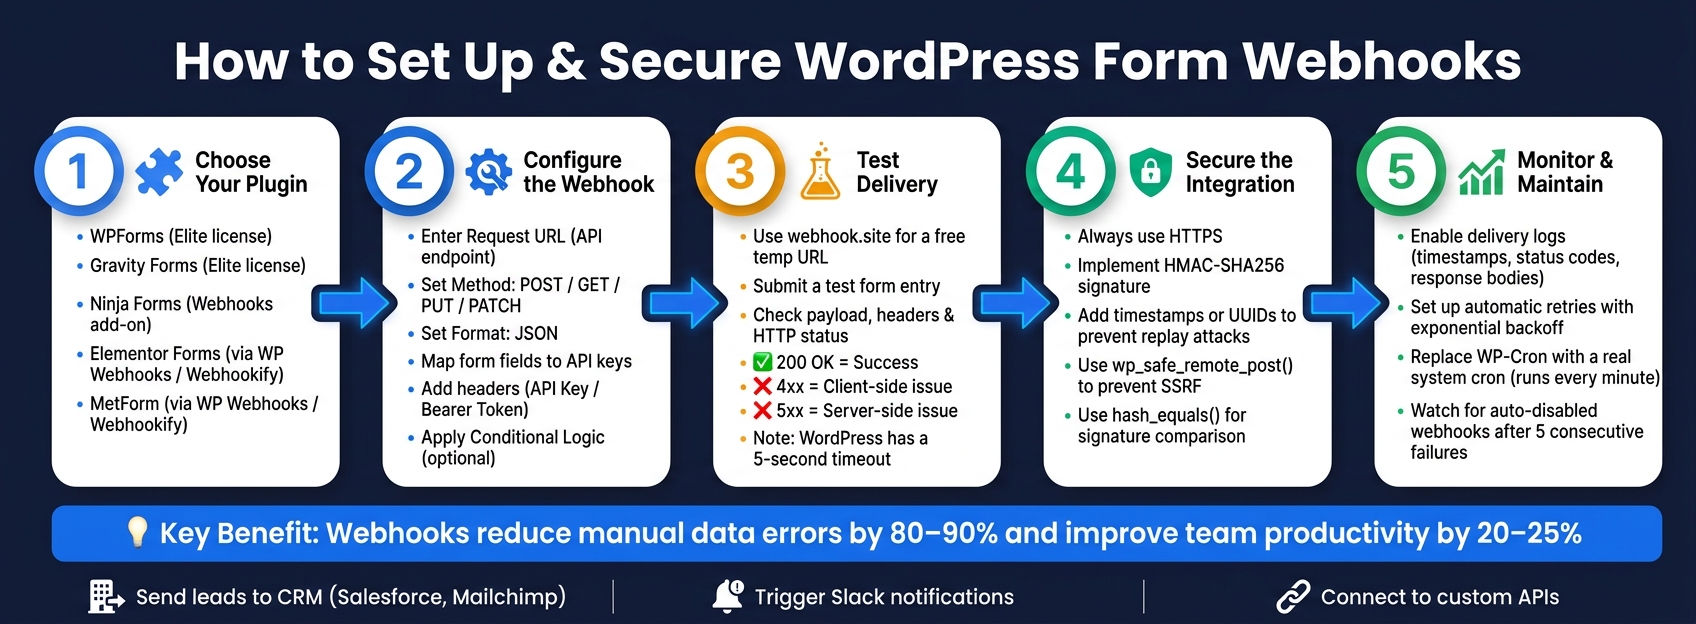
How WordPress Form Webhooks Work: Setup, Test & Secure
How to Send WordPress Form Data Anywhere (Webhook Setup)
sbb-itb-77ae9a4
Setting Up Webhooks in WordPress Forms
This section walks you through setting up webhooks in popular WordPress form plugins, making it easier to automate data transfers.
How to Configure Webhooks in WPForms
To use webhooks in WPForms, you’ll need an Elite license, which grants access to the Webhooks addon [1]. Once you’ve activated the addon, open your form in the form builder and go to Settings » Webhooks. Toggle Enable Webhooks to On.
Next, enter the Request URL from your third-party service’s API documentation. Choose the appropriate Request Method – use POST for sending new data, GET for retrieving data, or PUT/PATCH for updates. Set the Request Format to JSON.
In the Request Body, map your form fields to the API’s expected keys. For example, if the API requires a key named "email", link it to your form’s email field. WPForms handles multi-value fields like checkboxes by separating values with || in the payload. You can also define Request Headers for things like API keys or Bearer tokens. To make your setup dynamic, use Smart Tags to insert form data into headers or the body.
If you want the webhook to trigger only under certain conditions, enable Conditional Logic at the bottom of the settings.
How to Configure Webhooks in Gravity Forms
Gravity Forms also requires an Elite license to use its Webhooks Add-On. Open your form, navigate to Settings » Webhooks, and click Add New to set up a webhook feed.
"A webhook is an automated HTTP POST request triggered by an event. In Gravity Forms, a webhook fires when a form is submitted, sending the entry data as JSON to a URL you specify." – Jon Imms, WordPress Developer [7]
Start by naming your feed and entering the Request URL. Gravity Forms supports Merge Tags, allowing you to make the URL dynamic if needed. Select the HTTP method – POST is typically used – and set the format to JSON. When using POST or PUT, the plugin automatically sets the Content-Type header to application/json.
In the Request Body, choose whether to send All Fields or map specific fields. Add any authorization headers required by your API. To control when the webhook triggers, use the Webhook Condition setting. Save your feed and test it by submitting a form entry. If it doesn’t work as expected, enable logging under Forms » Settings » Logging to troubleshoot.
How to Configure Webhooks in Ninja Forms, Elementor Forms, and MetForm
For Ninja Forms, go to the Emails & Actions tab in the form builder after installing the Webhooks add-on. Add a new "Webhooks" action, input the Remote URL, and select the Remote Method (GET or POST). Then, define your Args – these are key/field pairs matching the API’s requirements. If authentication is needed, you can include a static API key here. To troubleshoot errors, enable Debug Mode in Advanced Settings.
Elementor Forms and MetForm lack built-in webhook functionality, but plugins like WP Webhooks and Webhookify can bridge the gap. Webhookify automatically detects Elementor Pro Forms. Just add your webhook URL in the plugin settings, and it will send submissions as a structured JSON payload, including form details like type, ID, and title, along with user input. WP Webhooks provides a "Form submitted" trigger for Elementor, supporting various request formats (JSON, XML, or form-encoded) and authentication methods like API Keys, Bearer Tokens, and Basic Auth [4][5]. Both plugins allow you to test connections before going live.
Once your webhook settings are in place, you’re ready to test and secure your integrations.
Testing and Securing Webhooks
How to Test Webhook Delivery
Before connecting your webhook to a live endpoint, it’s a good idea to test it with a request inspector. Tools like webhook.site offer free, temporary URLs that capture incoming requests and display the payload, headers, and HTTP response code in real time. Simply paste the generated URL into your form plugin’s webhook settings, submit a test entry, and check if the JSON structure matches the API’s requirements. This simple step can help catch most configuration errors before they cause issues in production.
If you’re working locally and your WordPress site isn’t publicly accessible, you can use a tunneling tool like Tunnelmole to create a public HTTPS URL for testing [8][9].
When testing, a successful webhook delivery should return a 200 OK status. If you see a 4xx code, it usually indicates a client-side issue, such as an incorrect URL, missing authentication headers, or a malformed payload. On the other hand, a 5xx code points to a problem on the receiving server. Keep in mind that WordPress has a 5-second timeout for outbound requests [12][10]. If the endpoint takes longer to respond, WordPress will treat it as a failure – even if the data was successfully received. To avoid this, ensure your endpoint returns a 200 status immediately and handles data processing in the background.
Once you’re confident in the webhook delivery, it’s time to focus on securing the integration.
How to Secure Webhook Integrations
After confirming the data flow works as expected, the next step is securing your webhook connections.
"A webhook endpoint is public by necessity, but it should never be trusted by default." – Nikola Jocic, Author [11]
Start by ensuring your webhook URL always uses HTTPS. Beyond that, implement HMAC-SHA256 for added security. This involves generating a hash of the request body using a shared secret key and including it in a header (e.g., X-Signature). The receiving server can then recalculate the hash and compare it to the header value. When performing this comparison, use hash_equals() instead of a standard === check. Regular string comparisons can leak timing information, which attackers could exploit to guess your secret key one character at a time [10].
You can further secure your webhooks with these additional measures:
- Include timestamps or unique event IDs (UUIDs) in every payload. This allows you to track processed IDs and reject duplicates, preventing replay attacks where someone resends a captured request.
- When sending webhooks from WordPress, use
wp_safe_remote_post()instead ofwp_remote_post(). This helps protect against Server-Side Request Forgery (SSRF) by validating the destination URL before the request is made [10].
Common Webhook Troubleshooting Tips
Even with secure integrations, webhook troubleshooting can be tricky without proper logging and monitoring.
One common issue with WordPress webhooks is that failures often go unnoticed. As WP Webhooks explains:
"The silence is the failure mode. No error in the WordPress admin. No email. No alert. The order shows as completed, the form shows as submitted – but your CRM, ERP, or automation platform never received the event." [2]
To address this, start by enabling delivery logs. Plugins like WP Webhooks (even the free tier) can log every attempt, including timestamps, status codes, and response bodies. This makes it much easier to diagnose problems [6]. Once logging is enabled, the HTTP status code can guide your next steps:
| HTTP Status | What It Means | What to Do |
|---|---|---|
| 400 | Bad Request | Double-check the JSON structure and field mapping. |
| 401 / 403 | Unauthorized | Ensure API keys, Bearer tokens, or IP allowlists are correct. |
| 404 | Not Found | Verify the endpoint URL for typos. |
| 429 | Too Many Requests | Slow down the request rate or increase retry backoff time. |
| 5xx | Server Error | Likely a transient issue – set up automatic retries. |
One often-overlooked issue is the unreliability of WP-Cron. WordPress’s built-in scheduler only runs when someone visits the site. On low-traffic sites, this can lead to webhook retries sitting unprocessed for hours. You can solve this by disabling the default pseudo-cron and setting up a real system cron job to call wp-cron.php every minute [2][12]. Additionally, be aware that some plugins, like WooCommerce, may automatically disable webhooks after five consecutive delivery failures. If your API experiences downtime, always check your webhook status afterward [9][10].
Practical Uses for WordPress Webhooks
With carefully set up and secure webhook configurations, you can create seamless integrations that save time and effort.
Sending Form Leads to CRMs and Marketing Tools
One of the most immediate benefits of webhooks is automating lead management. For example, when someone fills out a contact or quote request form, a webhook can send the data directly to a CRM like Salesforce or an email marketing tool like Mailchimp. This eliminates the need for manual exports. To make this work, you configure the target service’s API endpoint as the "Request URL", map your form fields to match the CRM’s expected keys, and authenticate the request using a Bearer token or an API key in the request headers [1].
The best part? You can skip third-party connector tools altogether. Using native webhooks reduces costs and avoids delays caused by additional processing layers [3]. You can even add conditional logic to handle specific scenarios, such as routing only "Request a Quote" submissions to your sales CRM while directing general inquiries elsewhere [1]. These automations not only save time but also minimize data-entry errors, making your team more efficient [3].
Triggering Notifications and Internal Workflows
Webhooks also shine when it comes to improving internal communications. For instance, a form submission can instantly trigger a Slack notification for your sales team, create a support ticket in a helpdesk tool, or initiate a multi-step internal workflow – all without anyone needing to check a WordPress inbox manually.
To ensure smooth performance, asynchronous delivery is a game-changer. This is especially important because optimizing WordPress performance ensures that background processes don’t negatively impact the user experience. Unlike synchronous webhooks – which make your site wait for the external service to respond before showing a confirmation message – asynchronous webhooks process events in the background. This way, users see an immediate "success" message while the notification or workflow continues behind the scenes [2]. For added flexibility, use conditional logic to control when webhooks fire. For example, you can set rules to alert the support team only when a form submission includes a high-priority flag [1].
Next, let’s look at how webhooks can connect WordPress forms to custom APIs for tailored business needs.
Connecting WordPress Forms to Custom APIs
For businesses with proprietary systems or internal databases, webhooks make it possible to connect WordPress forms directly to a custom API endpoint. You’ll set the endpoint URL, choose the appropriate HTTP method, format the payload as JSON, and map form fields to match the API parameters [1].
Selecting the correct HTTP method is crucial. Here’s a quick breakdown of common methods and their typical use cases:
| Method | Use | Example Use Case |
|---|---|---|
| POST | Create a new record | Sending a new customer inquiry to an internal database |
| PUT | Replace an existing record | Updating a customer’s full profile after re-registration |
| PATCH | Update a specific field | Changing only an email address from a preference form |
For internal APIs, it’s important to include a Secret Key in your webhook setup. This key generates a hash signature that your API can verify to ensure the request comes from your WordPress site [1]. Additionally, use a plugin with delivery logging enabled. If your API returns a 400 Bad Request, the logs will show the exact payload sent, making it easier to troubleshoot and fix any field mapping issues [2].
Conclusion and Next Steps
Webhooks simplify data transfers by automating the process, eliminating the need for manual exports, and ensuring your systems stay updated the moment a form is submitted.
To recap the setup process: start by identifying the trigger event and configuring the endpoint. Then, follow these essential steps: set your webhook to use POST with JSON, carefully map the form fields, and secure the connection with a secret key and HTTPS. Don’t forget to enable delivery logs to verify that your integration is functioning as expected. As WP Webhooks explains:
"The silence is the failure mode. No error in the WordPress admin. No email. No alert. The order shows as completed… but your CRM, ERP, or automation platform never received the event." [2]
To enhance your integration, consider upgrading to asynchronous delivery. This approach not only avoids delays but also ensures data integrity. By using a persistent queue, you can safeguard events from being lost if something goes wrong during delivery. Combine that with automatic retries using exponential backoff, and your setup becomes resilient enough to handle less-than-perfect conditions.
For more in-depth guidance on advanced topics – like asynchronous architecture, HMAC-SHA256 signature verification, and connecting forms to custom APIs – check out the tutorials and plugin guides available on WP Winners. These resources are designed for both beginners and developers, helping you create reliable, automated workflows for your WordPress forms.
FAQs
How do I add authentication to my form webhook?
To include authentication in a form webhook, you need to add credentials to the request headers.
For WPForms, this is straightforward. Navigate to the Webhooks settings and specify a header key and value, such as an API key.
For Gravity Forms, you can programmatically add headers, like Bearer tokens, using the gform_webhooks_request_headers filter. Here’s an example:
add_filter( 'gform_webhooks_request_headers', function ( $request_headers ) { $request_headers['Authorization'] = 'Bearer your_token_here'; return $request_headers; }); This ensures your webhook requests are authenticated properly.
How can I verify a webhook request is really from my site?
To ensure a webhook request is genuinely from your site, implement HMAC signature verification within your WordPress REST API. Here’s how it works: the external service signs the payload using a shared secret and includes this signature in a header (like X-Signature). On your end, recompute the signature using the same shared secret and compare it using hash_equals. This step helps guard against timing attacks.
Additionally, bolster security by always using HTTPS, validating the content type of the request, and checking timestamps to ensure the request isn’t outdated or tampered with. These practices collectively strengthen your webhook’s integrity.
Why do my webhooks fail even when the endpoint receives the data?
Webhooks in WordPress can fail without any obvious alerts because they rely on a synchronous delivery method. This approach doesn’t provide confirmation that the delivery was successful. Some common causes of failure include:
- Timeouts: If your endpoint takes longer than 5 seconds to respond, the webhook will fail.
- SSL Problems: Issues with your SSL certificate can block delivery.
- Server Crashes: If your server goes down, the webhook won’t reach its destination.
Repeated failures – typically around five – can result in the webhook being disabled entirely. Since WordPress doesn’t use a persistent queue or include built-in logging, even minor network hiccups or PHP errors can lead to permanent data loss. For those looking to improve their webhook integrations, WP Winners provides helpful resources to streamline and secure these processes.