
User Acceptance Testing (UAT) is the final step in ensuring your WordPress plugin meets user needs and works flawlessly in real-world scenarios. It goes beyond technical testing by focusing on usability, compatibility, and user satisfaction. This process helps identify and fix issues before release, reducing costs and improving user trust.
Key takeaways:
- Purpose: UAT ensures your plugin works across diverse WordPress environments and meets user expectations.
- Why it matters: Fixing issues post-release is expensive, and poor usability can lead to user frustration, lost revenue, and bad reviews.
- How to conduct UAT: Test in a staging environment, define realistic user scenarios, and use tools like WP-CLI or Slic to streamline setup.
- Best practices: Focus on real user workflows, automate repetitive tests, and integrate UAT into your development pipeline.
Example scenarios to test:
- Plugin installation and activation without errors.
- Admin settings pages for usability and functionality.
- Frontend features across themes, devices, and screen sizes.
WordPress Plugin User Acceptance Testing Process and Best Practices
The Power of WordPress Testing and Automation: Test Types and When to Use Them
sbb-itb-77ae9a4
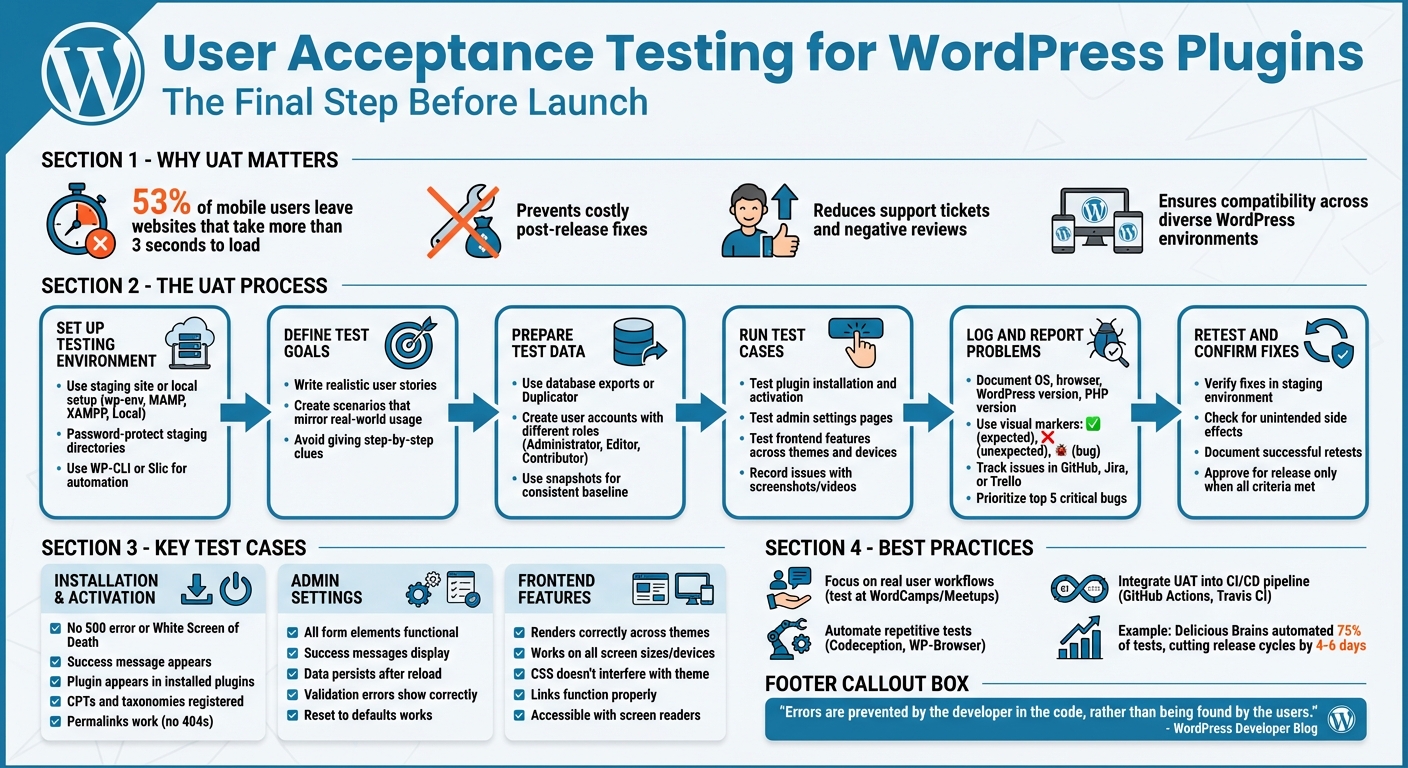
Why UAT Matters for WordPress Plugin Development
User Acceptance Testing (UAT) serves as the last line of defense before your plugin goes live. While technical testing ensures your code operates correctly, UAT confirms that your plugin functions seamlessly across the real-world WordPress landscape. This is crucial because WordPress sites vary widely in terms of core versions, hosting configurations, essential plugins, and themes. Without proper user testing, predicting every potential conflict is nearly impossible [4].
The stakes couldn’t be higher. Did you know that websites taking more than three seconds to load lose 53% of mobile users? [4] If your plugin causes performance hiccups or compatibility issues, you’re not just frustrating users – you’re potentially costing them revenue and damaging your reputation.
Let’s dive into how UAT tackles compatibility, usability, and support challenges specific to WordPress plugin development.
Testing Compatibility with Different WordPress Versions and Themes
Just because your plugin works in your development setup doesn’t mean it’ll work everywhere. UAT ensures your plugin performs well across the vast array of WordPress environments. Ghost Inspector puts it best:
"There’s an infinite combination of versions, hosting environments, plugins, themes, and configurations. You can’t trust the community to catch every bug that could affect your website" [4].
UAT is critical for identifying when updates to WordPress core or third-party plugins disrupt your plugin’s functionality. Nick Schäferhoff from WP Engine highlights this:
"By testing first, you can avoid any potential conflicts and ensure a smooth installation" [1].
Running tests in staging environments that mimic real-world setups – complete with multiple plugins and varied themes – helps uncover issues automated testing might miss. Compatibility is just the start; a smooth user experience is equally vital.
Delivering Better User Experience
A plugin that works perfectly on a technical level can still fail if users find it confusing or difficult to navigate. UAT is your chance to ensure the interface is intuitive. Sync4Tech explains:
"UAT confirms usability issues as observed in production-like scenarios" [5].
Real users interact with your plugin in unpredictable ways. They might skip steps, click buttons you didn’t expect, or combine features in ways you hadn’t anticipated. UAT captures these usability gaps that developers often overlook during unit or integration testing.
Reducing Support Tickets and User Complaints
Every bug that slips through to your users generates support tickets and, potentially, negative reviews. The WordPress Core Handbook highlights the importance of addressing these issues early:
"The most valuable results you can report are bugs that block you from completing the goal or trends about pain points and satisfaction rates" [3].
Setting Up for User Acceptance Testing
Testing your plugin in a controlled environment is essential to ensure it meets user expectations without risking your live site. This process involves creating a dedicated testing setup, defining clear objectives, and using realistic data to simulate real-world scenarios.
Creating a Testing Environment
Never conduct User Acceptance Testing (UAT) on your live site. Instead, use a safe, isolated environment like a local setup on your computer or a staging site that closely mimics your live server. For local setups, tools such as wp-env, MAMP, XAMPP, or Local are excellent choices. To automate the process, leverage tools like WP-CLI or Slic for quicker configurations.
For staging sites, consider using subdomains (e.g., staging.example.com), subfolders, or the one-click staging features provided by managed WordPress hosting services. If you’re testing compatibility with upcoming WordPress versions, the WordPress Beta Tester Plugin is a must-have. It helps identify potential compatibility issues early on. Be sure to password-protect staging directories and use a robots.txt file to block search engines from indexing these test sites.
For those comfortable with command-line tools, WP-CLI can simplify much of the setup. For example, the command wp scaffold plugin-tests [plugin-name] generates all the necessary files for running tests, including continuous integration configurations [6]. Additionally, Slic is a powerful CLI tool that automates the setup of Codeception testing environments, allowing you to focus on writing tests instead of dealing with complex configurations. These tools save time and streamline your UAT process.
Once your testing environment is ready, it’s time to outline your test goals and scenarios.
Defining Test Goals and Scenarios
The primary goal of UAT is to determine if your plugin solves the problem it was designed to address. To achieve this, write effective user stories that reflect real-life interactions. For instance, instead of saying, "Click on the Users menu to find roles", frame it as, "Check your co-worker’s permissions to see if they can publish content" [3].
"Tasks should be realistic and clearly written without describing the steps in too much detail. Use language you think would be used by users, and avoid giving clues like specific words used on the site" [3].
This approach allows you to observe genuine user behavior rather than guiding them toward a specific outcome. Once your test scenarios are ready, gather data that mirrors real-world usage.
Preparing Test Data
Realistic test data plays a crucial role in effective UAT. Use database exports (e.g., SQL files) or tools like Duplicator to replicate live site data, including menus, custom post types, and user-generated content.
"Choose a scenario that mimics the real world as much as possible, so that people can engage with the tasks as if they are real" [3].
For comprehensive testing, create user accounts with different roles – such as Administrator, Editor, and Contributor – to ensure your plugin manages permissions correctly. If your testing requires specific configurations (like pre-set menus or particular post types), use snapshots. Snapshots are packaged database and file sets that ensure every tester starts with the same baseline [7]. Reset the environment before each test session to maintain accuracy and avoid contamination from previous runs.
When preparing snapshots or test databases, exclude unnecessary directories like node_modules or vendor to keep the setup lean. For open-source projects or public testing, providing simple, text-based setup instructions can be more effective than snapshots, as they allow contributors to recreate the environment from scratch.
How to Conduct UAT for WordPress Plugins
This step ensures your plugin works as intended and meets user expectations. With your environment and test data prepared, you can dive into executing the planned user scenarios.
Running Test Cases
Start by installing and activating your plugin, then carry out tasks based on real-world scenarios. For instance, instead of saying, "Click the Users menu", describe the task as "Check a co-worker’s permissions to confirm they can publish content." This method highlights whether your plugin’s interface is intuitive and user-friendly.
After each test, reset your testing site to its original state to avoid interference from previous configurations. If collaborating with other testers, encourage them to verbalize their thoughts while interacting with the plugin. Take note of their reactions and any issues they encounter.
Make sure your plugin is compatible with the current WordPress version, active themes, and other installed plugins to uncover any conflicts early. Test both admin settings and frontend features to ensure everything functions as expected. Record any discrepancies between expected and actual results. Use tools like QuickTime to capture screenshots, GIFs, or videos to provide clear context for any issues you uncover.
Logging and Reporting Problems
Accurate issue tracking is key to effective troubleshooting. Your test report should include essential details such as the operating system, browser, WordPress version, PHP version, and active plugins/themes. Clearly outline the steps to reproduce the issue and differentiate between expected and actual outcomes.
Make reports easy to read by using visual markers. For example, use a green checkmark (✅) for expected results, a red X (❌) for unexpected results, and a bug emoji (🐞) to highlight specific issues. Include screenshots, GIFs, or screencasts for clarity. Additionally, provide technical logs like debug.log excerpts, browser console errors, and failed API call data from the Network tab to help developers resolve issues faster.
Centralize issue tracking using tools like GitHub, Jira, or Trello. Organize tasks with labels such as "Needs Testing", "[Type] Bug", "[Status] Duplicate", or "Needs More Info." If multiple testers are involved, summarize the findings by listing the "Top 5" critical bugs or blockers that hinder goal completion. This prioritization helps developers focus on the most pressing fixes, ultimately reducing support tickets and improving user satisfaction. Address duplicate issues promptly to avoid confusion. Once fixes are applied, verify that they resolve the issues without causing new problems.
Retesting and Confirming Fixes
When a fix is implemented, retest it in a staging environment to ensure the issue is resolved without introducing new bugs. Follow the original "Steps to Test" from your report to confirm whether the fix works as intended.
Always conduct retesting in a staging environment, not on a live site. Document successful retests with details about the environment, steps taken, and visual indicators like a green checkmark to confirm the fix.
During retesting, watch for unintended side effects – issues not mentioned in the original report or new bugs caused by the fix. Update the relevant GitHub issue or ticket with your findings. If a fix causes significant problems, disable the plugin via FTP by renaming its folder or restore a recent backup. Only approve the plugin for release once all acceptance criteria are met and verified through thorough retesting.
Sample UAT Test Cases for WordPress Plugins
These examples show how to organize your test cases to identify potential issues before users experience them. The focus here is on ensuring the plugin functions as expected from a user’s perspective rather than just meeting a developer’s technical requirements. Below are sample test cases that build on earlier setup steps and guide you through validating key plugin functionalities.
Testing Plugin Installation and Activation
Start by verifying that the plugin activates without triggering a 500 error, fatal PHP error, or the infamous White Screen of Death [2][1]. After clicking "Activate", check for the standard "Plugin activated" success message at the top of the WordPress admin plugins page. Ensure the plugin appears in the "Installed Plugins" table [2].
Next, confirm that any Custom Post Types (CPTs) and taxonomies are properly registered by using functions like post_type_exists() [8]. Verify that activation triggers a rewrite rules flush, ensuring new CPT permalinks don’t result in 404 errors [8]. Finally, test that the plugin’s primary objects – like custom posts – can be created and saved to the database immediately after activation [8].
Testing Admin Settings Pages
Once activation is confirmed, shift your focus to the admin interface. Log in, navigate to the plugin’s settings page, and interact with all form elements to ensure smooth user experiences. Use tools like WP Acceptance or WP Browser to simulate real interactions on Chrome. Test every form element, including text fields, checkboxes, radio buttons, dropdowns, and file upload inputs.
After submitting the form, verify the following:
- Success messages appear as expected.
- Data persists correctly after a page reload.
- Validation errors are displayed when needed.
- The "Reset to Defaults" button works as intended, restoring original settings.
Testing Frontend Features
Frontend testing ensures the plugin’s visible components – such as shortcodes, blocks, or widgets – render correctly across different themes and devices. Confirm that all plugin elements are displayed properly and maintain functionality on various screen sizes, especially on mobile [7]. Test form fields, checkboxes, radio buttons, and dropdown menus to ensure they operate smoothly within the theme’s layout [7].
Additionally, check that CSS styles do not interfere with the theme’s elements, maintaining readability and layout [1]. Ensure all plugin-generated links work correctly and are not disrupted by theme scripts [7]. Test animations to confirm they trigger as expected without making elements unclickable [7]. For accessibility, use tools like JAWS or other screen readers to confirm the plugin is functional for all users [3].
"The quality and effectiveness of WordPress plugins can vary significantly, and if you’re unfamiliar with the industry, it can be challenging to separate high-quality plugins from those that would damage your website." – Nick Schäferhoff, Performance and Security Specialist, WP Engine [1]
When testing dynamic frontend features, introduce small delays in automated tests to account for fading elements or slow-loading scripts [7]. Always conduct these tests on a staging site that mirrors the live environment to catch potential conflicts between the theme and other plugins before deployment [1].
Best Practices for WordPress Plugin UAT
Thorough testing is essential, but following these best practices can help refine your User Acceptance Testing (UAT) process and ensure your plugin performs reliably across various environments.
Focus on Real User Workflows
Design test scenarios based on how users actually interact with your plugin. Instead of generic instructions like "click on user roles", craft tasks that align with real-world goals, such as "Check your co-worker’s permissions to confirm they can publish content" [3]. This approach helps uncover usability issues and ensures your interface is intuitive.
"Tasks should be realistic and clearly written without describing the steps in too much detail. Use language you think would be used by users, and avoid giving clues like specific words used on the site." – WordPress Core Handbook [3]
Engage your target audience by testing at WordPress Meetups or WordCamps. These sessions offer unbiased insights into how users interact with your plugin. Recording these interactions can highlight pain points or blockers that developers might overlook. Remember to clear test data between sessions to avoid skewed results [3].
Automate Repetitive Tests
Save time and improve reliability by automating repetitive test cases. Tools like Codeception and WP-Browser are great for automating tasks such as verifying that your plugin activates without triggering a 500 error [2]. For example, in 2017, Delicious Brains automated 75% of WP Offload S3 tests, cutting down release cycles by 4–6 days and catching bugs that manual testing missed [10].
You can quickly set up automation with WP-CLI by running wp scaffold plugin-tests [plugin-name], which generates the files and directory structure needed for testing [9]. For even faster setup, tools like Slic can configure Codeception environments automatically, handling complex setups like Docker or local databases [2].
Add UAT to Your Development Pipeline
Integrate UAT into your CI/CD pipeline to make testing seamless. Tools like GitHub Actions or Travis CI can automatically run tests after every commit, ensuring your plugin remains stable across different PHP and WordPress versions [9]. WP-CLI simplifies this process with the --ci=github flag, which generates workflow files for CI integration [8].
"Incorporating tests into your workflow prevents regressions and ensures stability and builds confidence with every new release." – David Perez, WordPress Developer Blog [8]
To streamline testing, configure composer.json with test-install and test scripts for automated setup and execution [8]. For plugins requiring specific data sets, WP Acceptance can use snapshots to transfer custom menus or post types to CI runners, ensuring consistent test configurations [11]. While local testing provides immediate feedback, CI testing ensures your plugin functions across diverse environments before release [8]. Together, these steps help you maintain a robust and reliable plugin as it moves closer to launch.
Conclusion
User Acceptance Testing (UAT) ensures your WordPress plugin functions as intended, delivers meaningful value, and provides a smooth user experience and reliable performance [12]. By identifying and addressing errors during development, rather than leaving users to encounter them after launch, UAT safeguards your reputation.
"Errors are prevented by the developer in the code, rather than being found by the users." – David Perez, WordPress Developer Blog [8]
UAT goes beyond simply verifying functionality. It fosters trust among users by demonstrating your commitment to quality. Start by testing in controlled environments, then move to realistic clones and production backups to catch persistent problems, like confusing interfaces or unstable settings, before they reach your audience [12]. Running tests over multiple sessions also helps identify how your plugin handles real-world workflows and ensures compatibility across various WordPress setups [12].
Incorporating actual user workflows and automation into your UAT process is essential for effective plugin development. By following best practices – such as focusing on real user scenarios, automating repetitive tasks, and seamlessly integrating UAT into your development pipeline – you can turn testing into a natural part of your workflow. This approach not only improves the quality of your releases but also builds confidence with every update.
For additional resources to refine your plugin development process, check out WP Winners. Their guides, tutorials, and tools can support both beginners and experienced developers in crafting superior WordPress plugins.
FAQs
What’s the difference between UAT and functional testing for a WordPress plugin?
While both User Acceptance Testing (UAT) and functional testing are essential, they focus on different aspects of a plugin’s development. Functional testing zeroes in on whether each feature performs as expected, emphasizing technical precision and system performance. This type of testing is typically handled by developers to ensure everything operates according to specifications.
On the other hand, UAT takes a broader perspective. It assesses how the plugin performs in real-world scenarios, focusing on usability and whether it aligns with user expectations and business objectives. UAT involves actual users or stakeholders, making it the final checkpoint to confirm the plugin delivers practical value before it goes live. In essence, functional testing ensures the "how", while UAT validates the "why."
How many real users do I need for effective plugin UAT?
To make User Acceptance Testing (UAT) effective, include a group of 5 to 10 diverse users. This approach helps you gather meaningful feedback and identify usability problems. Keeping the group small yet varied ensures you get actionable insights without making the process difficult to manage.
What should I test first to catch the most common plugin issues?
Testing a plugin starts with verifying its core functionality. Make sure its primary features perform exactly as they should. Once that’s clear, move on to compatibility tests. These involve running integration tests to ensure the plugin works smoothly alongside your WordPress theme and any other plugins you have installed. This step is crucial for catching common problems early in the process.